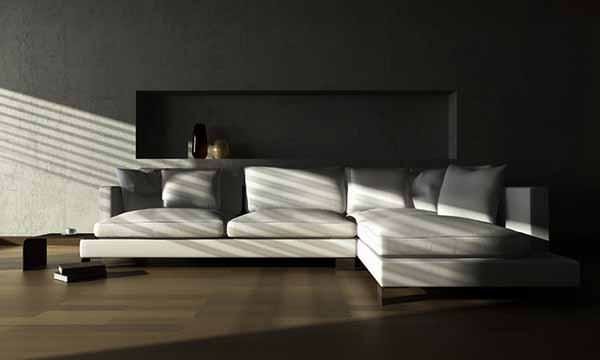
Good Lighting in 3D Renderings

Good Lighting in 3D Renderings
Creating Mood, Depth, and Realism Through Thoughtful Illumination
Lighting is one of the most powerful tools in 3D rendering. Whether you're crafting a cinematic scene, showcasing architectural design, or developing product visuals, lighting isn't just a technical necessity—it's a creative decision that defines mood, enhances realism, and draws attention to what matters.
Just as photographers and cinematographers craft lighting setups tailored to their subject and message, so too should 3D artists treat lighting as a storytelling tool. At 3DAStudio™, we believe that exceptional lighting is what separates a good rendering from a truly compelling one.
In this article, we’ll explore core lighting strategies, techniques, and creative principles that help elevate your renderings—whether you're working in architectural visualization, product illustration, or interior design.
Understand the Role of Global Illumination
One of the first steps to achieving believable lighting is enabling Global Illumination (GI) in your rendering engine. GI simulates the complex behavior of light in the real world—how it bounces, reflects, diffuses, and interacts with materials and surfaces.
This adds subtle realism by:
-
Allowing light to softly fill shadowed areas
-
Reproducing color bleed from one surface to another
-
Improving depth perception in the scene
While GI can increase rendering times, its contribution to realism is essential—especially when paired with high-quality textures and physical material shaders.
Simplify Your Light Sources for Outdoor Scenes
When rendering exterior scenes, less is often more. Most outdoor environments can be lit using a single directional light (representing the sun) and a sky system for ambient fill. Overcomplicating your lighting setup with multiple artificial lights can lead to an unnatural or over-lit result.
There are two popular approaches:
-
Physical Sun and Sky Systems – These simulate daylight using a sun lamp and sky dome, adjusting shadows, color temperature, and intensity based on time of day.
-
HDRI (High Dynamic Range Image) Lighting – An image-based technique where an HDR environment photo is wrapped around your scene, providing realistic lighting and reflections tied to the photo’s exposure data.
These methods, combined with GI, provide natural results without the need for excessive manual tweaking.
Use a Clay Render Pass to Refine Light Behavior
When building a lighting setup, it’s often helpful to temporarily override all materials with a neutral gray or white matte material. This "clay render" technique allows you to focus solely on how light interacts with geometry—without textures or reflective materials interfering.
Once you’re happy with the lighting setup, reintroduce your actual materials and adjust them accordingly to match the lighting rig. This method ensures consistent balance between mood, exposure, and material properties.
Render Lighting Passes Separately
For flexibility in post-production and compositing, consider rendering lighting elements as separate passes (e.g., key light, fill light, ambient light, specular highlights). This workflow gives you greater control when refining an image in Photoshop, After Effects, or your preferred editing software.
Adjusting shadows, color tones, or highlights in post becomes easier and more efficient than re-rendering the entire scene.
Mind the Light Direction and Color Temperature
Light placement is not just functional—it’s emotional. The direction, intensity, and color temperature of light profoundly affect how your scene is perceived.
Consider the following:
-
Side lighting enhances surface detail and texture
-
Backlighting adds drama and separates foreground from background
-
Warm lighting (e.g., sunset tones) creates comfort or nostalgia
-
Cool lighting suggests modernity, morning light, or sterile environments
Use lighting directionally to guide the viewer’s eye, emphasize focal points, and set the atmosphere.
Preview in Real-Time When Possible
Modern render engines like V-Ray, Corona, Lumion, and Twinmotion now support real-time or interactive rendering previews. Use these tools to adjust lighting in your viewport as you work, rather than waiting on repeated full-resolution renders. This drastically improves iteration speed and fine-tuning.
Study Real-World References and Master Painters
Great lighting design is rooted in observation. Studying real-world photography, film cinematography, and master painters can provide valuable insights into composition, contrast, and storytelling.
Painters like Rembrandt, Vermeer, or even modern concept artists demonstrate lighting principles that aren't always physically accurate but are emotionally effective. Don’t be afraid to break the rules in favor of a stronger visual impact—especially if your goal is to evoke a mood, not simulate physical reality.
Develop Your Own Signature Lighting Style
At 3DAStudio™, we encourage artists and clients alike to see lighting as more than just a technical checkbox. It’s your fingerprint, your visual voice. Whether you prefer moody overcast environments, high-contrast interiors, or golden-hour atmospherics—your lighting style helps define your brand.
Especially when working in CAHD™ (Computer Aided Human Designed) workflows, lighting becomes a point of creative refinement. AI tools can offer lighting suggestions, but the final artistic decisions should always be human-led.
Final Thoughts: Let Light Tell the Story
Lighting is not just illumination—it's narrative. It defines space, evokes feeling, and reveals form. Whether you’re creating a residential rendering in Seattle, a product showcase in New York, or a virtual showroom tour in Los Angeles, lighting remains one of your most powerful storytelling tools.
If you need help crafting stunning visualizations with professional-grade lighting, 3DAStudio™ is here to guide you through the process from concept to completion.
Let us help you light your vision—beautifully and effectively.